
Time to get into serious business now: Let do some surgery. The object: Asus Xonar Essence One audio board.
I’m gonna make it quick. The ordinary Nichicon is no where good for my taste (it could be for me only, yours could be different). So I pick several candidates as listed here.
To be honest, the process is not that easy. It was easy to remove the capacitor, but to plug the new one, definitely it will need some time due to the small hole (this board is very stingy with the hole size).
All components here are soldered in WBT solder and Cardas Rosin Flux.

Mostly Cerafine in the power supply bypass section, as I want more analog sound usually best with Elna ‘Red ROA’ Cerafine.
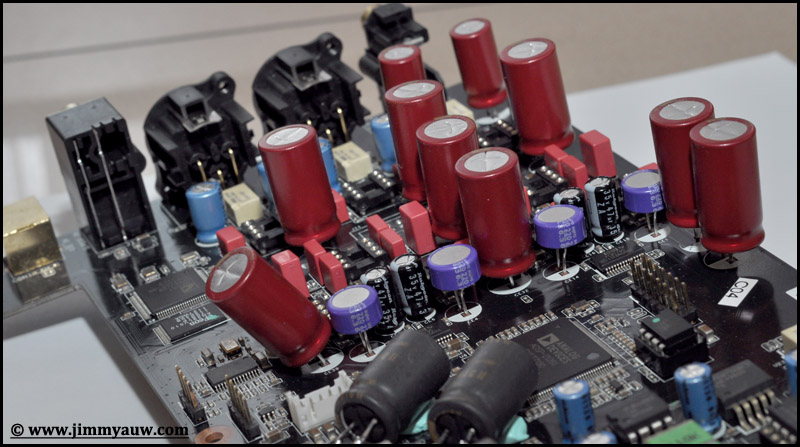
Some additional Vishay MKP on the feedback section of the final buffer stage. Giant Cerafine are all around.

We can also find Rubycon ZA and Os-Con SP here. I bought this ZA probably 5-6 years ago. Hard to find later these days…
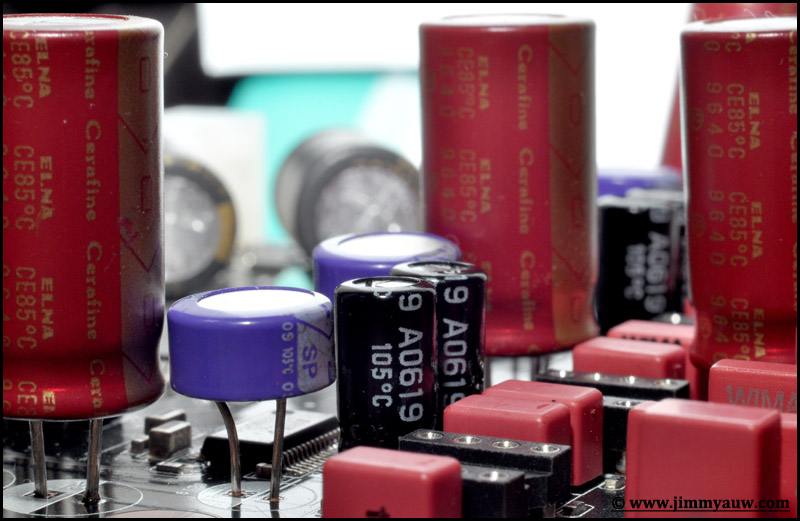
Ah the other favorite, Silmic II. It has different character with Cerafine, but they are fine when combined together (I hope so).

The original ‘IDE hard drive like’ wires also have been removed. Change to 0.5 mm UP-OCC wire with Teflon insulated.

Not an easy job to assembly 12 wires in such small place. But it’s a matter of time and hard work anyway.

The original ‘IDE hard drive like’ signal wire. I don’t really think I can live with it. Your weakness is the weakest part of you…
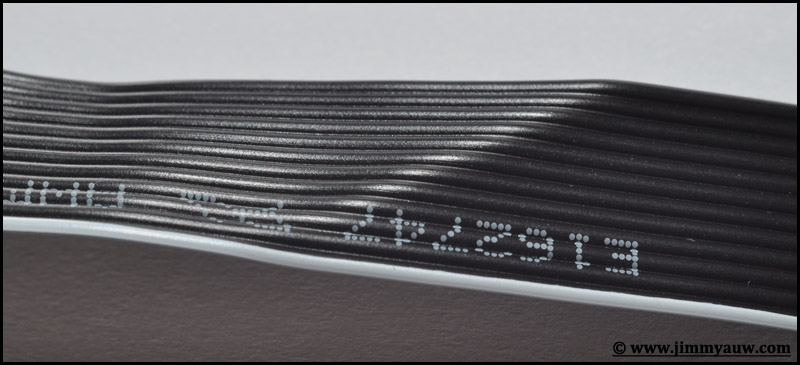
The original cable uses 12 pins socket. Convenient as you can remove the cable, but I don’t really see any point where you need to remove this cable anyway. So, I think I have made a right decision with permanently terminated UP-OCC wires here.

A friend seems like wants to join me on this soldering process… 😉


Agus
May 10, 2013 21:47Malem Ko,
Mantap ini, tinggal yang ijo diganti tvc .. hehehe 😀
Salam 🙂
Auw Jimmy
May 10, 2013 23:32Malam Bro,
Ada dua alasan yang mungkin tidak akan membuat hal itu terjadi:
1. Ga ada budgetnya (sudah dibahas kan kalo capacitornya dijual semua pun masih belum kebeli TVC).
2. Saya ga begitu cocok ama suara TVC. Bukan berarti ga bagus loh. Sama seperti saya yang tidak begitu suka LOT juga. Maklum kuping kampung.
Thanks.
Agus
May 11, 2013 13:27Siang Ko,
Hahaha….
No.1 ga setuju banget…. tvc dijual juga ga cukup buat beli Duelund kue keranjang sebiji… 😀
No.2 setuju bgt deh .. selera masing2… kuping kampung mana nih? wkwkwk…. 😀 g kebayang deh kampungnya….
Salam 🙂
Auw Jimmy
May 11, 2013 14:41Sore Bro,
Kue keranjang yang mana dulu nih…
1. Versi Cast Copper (available at PCX dan HiFiCollective) sekitar $200 sebiji. Ini kayanya masih dapat kembalian cukup banyak nih kalo dibarter ama TVC 😉
2. Versi VSF Cast Copper (original VSF winding) sekitar $600 sebiji.
3. Versi VSF Cast Silver (original VSF winding) sekitar $1300 sebiji.
Harga sepasang silakan dikali dua.
Jadi ya tinggal dipilih mau lawan yg mana. Suara jelas beda sih, ada rupa ada harga 😉
Ukuran fisik juga beda. Yang nomor 1 mah lebih mirip lontong. Yang nomor 2 dan 3 baru mirip kue keranjang. Khusus nomor 2 dan 3, sepertinya ga ada yg ready stock, tapi bisa pesan ke PCX dan HiFiCollective. Siap2 nunggu paling cepat 2 bulan, exclude shipping time 🙂
Thanks.
Agus
May 12, 2013 09:22Pagi Ko,
Seremmmm…. makanya ga setuju banget kalo dibilang ga ada budget… wkwkwk 😀
Kan ko Jimmy ga salah punya 10 biji yg silver… ;D
Salam 🙂
Auw Jimmy
May 12, 2013 09:31Pagi Bro,
Seingat saya waktu itu ada alasan #2 deh. Coba liat2 lagi…
Lagian maksud saya cuman menegaskan bahwa kalo kebeli TVC bisa kebeli Duelund koq. Jangan ditafsirkan yang lain2. So topiknya kembali ke TVC ya.
Thanks.
Agus
May 12, 2013 10:09Pagi Ko,
wkwkw… nyerah deh.. lanjut Asus XOnarnya deh .. 😀
Salalm 🙂
Auw Jimmy
May 12, 2013 11:14Siang Bro,
Lanjut juga preamp TVC nya jangan lupa dibawa ke Bintaro ya 🙂 Pasti banyak yg mau dengar…
Thanks.
Agus
May 12, 2013 12:04Siang Ko,
Aduh.. masak pre amp pemula dipamerin ke master2…. ga berani ahh… 🙂
Salam 🙂
Auw Jimmy
May 12, 2013 12:42Siang Bro,
Pemula koq kaya gitu mainannya 😉
Thanks.
Jembrong
May 14, 2013 11:02Nyamuknya bagus
Auw Jimmy
May 14, 2013 12:49Ntar gue kirim ke Serpong deh buat nongkrong di rumah baru Bos Jembrong.
Thanks.
Jan Soldan
May 16, 2013 12:10Hi Jimmy,
do you have some comparison experiences with Os-Con SP against older series SG and new one SEPC? I mean for DAC digital section.
Thanks
Vasil
July 29, 2013 05:18Hi Jimmy,
What Vishay caps did you use on final stage (capacitance)?
Auw Jimmy
July 29, 2013 21:27Hi Vazil,
I don’t use any Vishay, I think?
Thanks.
Sam
April 24, 2014 10:58That is awesome. I tried to get a basic Xonar moddified but I was told i could not because the pcb was double something 🙁